Monday, May 31, 2010

Coffee Table Turned Flower Pot

DSC_1870
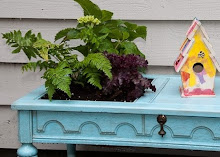
We finally finished converting the free coffee table I got off of Craigslist into a flower pot and I LOVE how it turned out!
I got the table a week ago thinking I would use it in my family room, but when I got it home, it turned out to be entirely too small.  I was trying to think of alternate uses for it when my husband suggested we plant flowers in it.  I agreed immediately and began plotting just how I’d do it.

Here’s what it looked like when I started:

DSC_1739
It was a bit worse for wear and someone had been gnawing on the corners.

DSC_1742
My first task was to try to improve the corners a bit.  It’s going outside, so I knew it didn’t have to be perfect, but I wanted it to be a little smoother looking.  Out came the wood putty and sandpaper and the chewed corners began  looking a little better.

DSC_1828
Next came primer and it’s looking better already!

DSC_1830
I love the detail on the front.  I think it makes it look so dainty!

Next, it got several coats of aqua spray paint.  The color was a bit garish, but I knew it was going to be toned down quite a bit by the time I was done, so I kept painting.  I wanted it distressed, so I sanded down the edges after each coat of paint.

DSC_1834
To tone down the aqua, I grabbed some wood stain and a rag and went to work.  I’d never aged or distressed anything, so I was a little concerned about this step, but I figured, worst-case, I’d have to repaint it.

I wasn’t sure how long to leave the stain on or how much stain to wipe off, but I soon learned that it worked best if I wiped it off just after I put it on and if I actually tried to get ALL the stain off.  The stain got left in the nooks and crannies and in any scratches on the wood, so it made it look old and weathered.

DSC_1839
Once the paint had dried, I gave it three coats of spray Poly Acrylic.  I wasn’t a fan of the spray while I was doing the coats because it was hard to tell where it went and it never seemed thick enough.  Once it dried, though, it was clear that it had very good coverage.

At this point, I was really excited!  It was shaping up better than I had dreamed.  We were heading into the more iffy part of this project, though: making the plant “boxes”.
The plan was to use chicken wire and coconut liners to  make our own planters.  We debated how to attach the chicken wire to the table and eventually decided to staple it to the inside of the vertical pieces.

We folded the chicken wire into a box and used zip ties to hold the corners together:

DSC_1842
(Make sure you use gloves when working with wire…that stuff hurts!)

DSC_1843
Once the boxes were ready, we stapled them to the wood with as many staples as we could possibly fit in.

DSC_1851
I’m a little bit concerned about how well this will hold over the long-term, but it seems to be pretty strong so far!
Then, we stuffed in the coco-liners.

DSC_1852
It’s raining outside this morning, but I couldn’t wait to see  the final results, so out I went in the rain to finish planting.  And now I have first-hand knowledge that the poly is working: the rain is just beading up on top.

DSC_1862
And here it is:

DSC_1871
DSC_1872
DSC_1869

I am in love!
 
UPDATE: I’m seeing a TON of referrals to this project from somewhere on Facebook, but I can’t tell from where.  So, if you got here from Facebook, can you pretty PLEASE tell me who featured me?  Thanks!


I’m going crazy this week and linking up to:
The DIY Show Off toolsareforwomentoo Making All Thingz Related  http://linda-coastalcharm.blogspot.com/ Visit thecsiproject.com Show and Tell Green
giveaways

Garden Party 2010 at Southern Fried Dreams

Sunday, May 30, 2010

Cleaning Grand Plan – Misc. Recap

DSC_1848 
What a busy week!  I felt like I was hardly home and when I was home, I wanted to spend time working on my free Craigslist find and NOT on silly organizing.  I did make it through most of my list, though.  Here’s my status:
  • Clean Goodwill pile off the dining room table and take it to Goodwill! [x]
  • Put old toy shelf on Craigslist
  • Put away decor items sitting on coffee table in living room [x]
  • Clean out closet in play room [x]
  • Find home for box of VHS tapes (preferably not in my home) [half done]
  • Wipe down walls and baseboard in living room/dining room [x]

I didn’t put the toy shelf on Craigslist yet because I thought I might be able to use it when I cleaned out the play room closet, but I didn’t, so I’ll put that up next weekend.  And I still need to take care of the box of videos.  Though I did have my husband put all the VHS tapes in a bag for Goodwill, apparently there were even more DVDs underneath those!  Now I have to figure out what to do with them.

The big job this week, though, was the play room closet.  I spent several hours this morning taking everything out and putting only a portion back in.  It was a big task and I still have a headache from it!

You may remember what it looked like before:

DSC_1721

Actually, this is after I removed a bunch of stuff because I couldn’t open the doors at first.

After loading up two large bags of recycling and one bag of garbage, with a bit to donate for the next Goodwill trip, this is what it looks like now:

DSC_1847
Once again I had to curb my desire to head over to The Container Store and I just used what I had.

The tall multi-drawer shelf on the right was given over completely to the girls’ art supplies.  They now have easy access to yarn, googly eyes, clothes pins, and popsicle sticks.  This led to an afternoon of art making for them.
I’ve left the green and pink cubes empty for now so my sister will have somewhere to put her clothes when she visits next weekend.

I’ve seen many cute wrapping centers all over the blogosphere recently.  I don’t have one of those.  As much as I love them, I don’t really need a dedicated area.  You’ll see our wrapping paper bin to the left, behind the doors.  But the thing that made the biggest improvement in this closet is the gift bag organization.

Before, we were overrun with gift bags.  Every time we’d get another one, we’d just throw it in the closet.  In fact, they’re the reason we couldn’t open the door.  Now they’re all organized roughly by theme (baby shower, holiday, kids bags, adult bags) and hanging separately in the closet.  Tissue paper, bows, and clothing boxes also have their own bags.  I’m very pleased with it!

DSC_1848
The cardboard box on top of the bins is empty and waiting for the various egg cartons, cereal boxes, and other garbage stuff that the girls will inevitably want to save for an art project.  It drives me nuts to see their stock piles of recyclables, so I figured I should be proactive and address the issue now!

I’m going to be taking a break from the organizing next week.  It’s another crazy, busy one; ending with me taking the Girl Scouts camping and my sister arriving mere hours after I get back.

I’m nearly done converting my Craigslist freebie and I’m so excited to share it with you tomorrow.  Here’s what it looked like a few days ago:

DSC_1739


It’s taking on a new life now, though.  It’s a coffee table no more!

I'm linking this post up to:

Friday, May 28, 2010

Inspiration!…Finally!

I am so excited that I’m practically bouncing in my seat!  I finally (finally!) have some inspiration for how I want to finish my family room.
 
I talked about it a bit when I showed you my TV-cubby-turned-bookshelf, but that’s the last thing we did with it and it’s been sitting there – a hodge-podge of furniture and colors - for months.  And it’s been driving me crazy!
 
The problem was, I had no inspiration, so I had very little idea what colors I wanted to use.  And every time I actually thought I was on to something, I’d waffle and think of something else. 
Here’s a picture of the room as it currently stands (with its 437 different colors):
DSC_1837
 
The biggest problem for me is that I have two different colored couches (one light and one dark).  I could NOT figure out how to tie them together!
 
The couch on the right is actually slip-covered right now.  It began life in a beautiful, very light green, dry-clean only fabric.  Suffice it to say, it’s not doing well with our 2 kids and 4 cats.  The day that Thing 2 threw up all over it was the day that I ordered the slipcover from Stretch and Cover.  Unfortunately, it makes the room even more bland.
 
I finally admitted I needed help this past Monday and I headed over to Calico Corners for some help with fabric selection.  Almost immediately, I fell in love with this Annie Selke fabric:
Annie Selke Shalini
 
I knew I definitely wanted to do a pillow out of this.  We were trying to figure out what to use for the ottoman that we’ll be making, when the woman helping me suggested we go check out a vignette they had set up.  I turned the corner and saw this:
Calico Corners Inspiration 1
I nearly died when I saw that ottoman!  “I want THAT!”  Unfortunately, the avocado velvet has been discontinued.  But the nice lady told me that they might be able to sell me the floor model for $850 or so!  For an ottoman?! Ack! 
 
We put my favorite fabric up on the couch with the other pillows and it looked just gorgeous.  Unfortunately, we couldn’t find any other options for the ottoman.  Once I’d seen that fabric, it was all I wanted.
 
I checked out the fabrics, brought them home, hemmed and hawed, went back today and found another green velvet-y fabric that I like almost as much and came back home to hem and haw.  And I’m IN LOVE!  And so stinkin’ excited! 
 
Since I can’t do anything right now, I thought I’d try out Polyvore and see if I could come up with a sample of what I’m going for et voila!

Light Couch and Pillows

The dark green square in the foreground will be the ottoman and the swirly green square at the right is a possibility for the curtains.  (Actually, I found some sheets at Bed, Bath and Beyond that are very similar and I think I might use those instead.)

And here’s an idea for the brown couch:

Brown Couch and Pillows 
We’ll make the ottoman and it will be the same style as the one I saw at Calico Corners (without the $1,100 price tag).  Here’s a close-up of my new love:

Calico Corners Inspiration 3

While I was at Bed, Bath and Beyond, I found some really cool pillows that I want to copy.  I couldn’t find them online, but I did take some pix with my phone:

BBandB Ribbon Pillow

BBandB Flower Pillow BBandB Pattern Pillow
I am just giddy and I can’t wait to order my fabrics and actually get to work.  Do you think Calico Corners is open right now?

Thursday, May 27, 2010

Versatile Blogger Award

I just received my first blogger award from Mandy at http://mintnclandycreate.blogspot.com/.  Thank you, Mandy!

Mandy’s blog is dedicated to “craft, creation & fun!” and she has some really cute ideas.  I especially love her butterfly mobile.  Plus, she has blog posts dating back to 2005. (Do I sense a tech-y somewhere in the household?) You should check her out!

So, the rules for receiving this award are:

  1. Thank the person who gave you this award
  2. Share 7 things about yourself.
  3. Pass the award along to 15 bloggers who you have recently discovered and who you think are fantastic! (in no particular order...)
  4. Contact the bloggers you've picked and let them know about the award.

Coming up with 7 things to share about yourself is actually pretty difficult, but:

  1. One of the guiding principles of my life is “Just start writing”.  I’m not a writer, but one day, in high school, I was worrying to a friend about how I was going to finish a paper.  She shared with me some advice that someone else had given her: to “just start writing” and fix the problems later.  She doesn’t even know it, but I took that advice to heart and I use it in every aspect of my life…although sometimes it translates to “Just do it!  You don’t need a plan!”
  2. I consider myself to be a Jack-of-All-Trades, but Master of none.  I’m willing to try almost anything once and I generally end up doing a fairly decent job, but I’m not an expert in any one thing.  That makes me sad sometimes.
  3. My family’s lore includes a story of my dad putting a hammer through a wall one day to mark where he and my mom had decided a built-in book shelf should go.  He figured if he put a hole in the wall, they’d have to finish the project.

    I carried on this family tradition one day by putting a hammer through a bathroom wall that I felt needed to go.  My husband was rather surprised when he came home!
  4. I’m a geek and proud of it! (But I blame my husband.  It’s his fault.)  In my professional life, I’m a Web/software developer and I love Science Fiction, especially if it has to do with time travel and I know that Star Trek is better than Star Wars.
  5. I $%#%$# hate it when people cut in line.  I don’t know why, but it sends me through the roof.  Perhaps it offends my sense of orderliness.  I nearly asploded during a visit to Versailles because people were shoving in front of me.  Grrrrr.
  6. I met my husband on the Internet before it was cool (See #4).
  7. Pizza, red licorice, and ice cream are my food vices - there is no moderation when it comes to those.  That’s why I try to keep them out of the house…except on Family Movie Night!

And to pass on this award, here are 15 sites that I’ve found that I really enjoy:

Becca at Home is Where my Story Begins
Anna at An Inch of Gray
Vanessa at Decor Happy
Meeks at Juggling Motherhood
Pine Tree Home
Shannon at Posh Pieces
Alicia at A Beautiful Mess
Leanne at Organize and Decorate Everything
Fern Valley Farms
Janna at Mommy’s Piggy Tales
Rebecca at Older and Wisor
Danya at I Can Make That
My Sweet Creations
Booyah’s Momma at The Adventures of Chip and Bobo
KaseyQ at The Beautiful Thrifty Life

Wednesday, May 26, 2010

Have You Had THE TALK?

So, it turns out that I’m also a Girl Scout leader.  Who knew?!  I just got back from watching the girls bridge from Brownies to Juniors and I was thinking about something that happened last weekend, so I thought I’d share…

I’ve led this troop since she they were in kindergarten.  They are now 9 year old Brownies who sold a TON of cookies this year.  One of the activities they planned to spend their cookie money on was horseback riding.  This they did last Sunday.

girlscouts_horses6

It was actually a badge workshop wherein they learned about different types of horses, parts of a horse, etc.  At one point, the workshop leader described a mare.  Then, she described a gelding.

When I heard her say gelding, my ears pricked up because I wanted to hear how she was going to describe this state to a bunch of 9 year olds.  She said something fairly innocuous about a gelding being a male horse that has been altered so it can’t make babies.

Now my daughters know about the making of babies (much to Thing 1’s chagrin), but I know there are some families out there who are not yet prepared to have that conversation with their 3rd grader, so I wondered if that description had tripped any wires in any of the girls’ minds.

I made a joke to my co-leader that now I was going to have to get permission slips from all the parents to have a “difficult conversation” and we both laughed (yes, Girl Scouts really does have a permission slip for that).  From there, we went on to the terrors of junior high and tried to see who had the most horrifying teen promiscuity story.  (Now that’s scary!  Have you SEEN Oprah?!)

While driving home afterwards, I asked the girls what they had learned about horses that they hadn’t already known.  When one girl piped up that she didn’t know that the boy horses could have babies, my heart skipped a beat!

face-embarrassed1

It skipped two beats when another girl (and my daughter) corrected her and said no, they can’t have babies.  I could just hear the first girl’s cogs turning.  She opened her mouth to question this, but my co-leader and I took that opportunity to jump into the conversation; loudly trying to change the subject.

We succeeded, but I’d love to have been a fly on the wall at bedtime for that family…”Mommy, what’s a gelding?”

I am so getting called to the principal’s office!

dunce_cap

Related Posts with Thumbnails