Sunday, February 20, 2011

Hardwood Here We Come!

I told you all about our recent experience with water damage and how we ended up doing most of the repair work ourselves because we were afraid insurance wouldn’t be covering it.  What I’ve neglected to mention is that, while our insurance didn’t cover the roof repair because it was a defect in the roof, they did cover the water damage restoration – they even paid US for the work we did repairing the drywall!

We’ve pretty much finished everything we needed to do to get back to normal.  The last piece of the puzzle was to replace the little bit of carpet padding that had been cut out and have the floors cleaned and re-stretched.  We got an estimate to do that and it was obscene!  I could not believe anybody could actually give a bid so high without batting an eye!  The insurance company was going to pay it, though, so I asked if we could just have the money to put towards replacing the carpet, rather than repairing the ratty old carpet that was there anyway.  They said yes and sent us a check which would have gone a good ways towards re-carpeting the whole room.

But now my imagination was taking off:  I don’t want carpet in that room anyway – I want hardwood!  And if we do the living/dining room, then of course we should do our family room and have the whole downstairs be wood.  But then, what would we do with the wood that already ran from the entry to the kitchen?  It’s a light maple that is yellowing as it ages and I’m really tired of it. 

DSC_3549

Thus began our foray into the world of hardwood and Oh My Lord! are there a lot of options.  It’s completely overwhelming!  Hundreds of types of woods, Millions of stain colors, and Bajillions of finishes.  How does anyone ever make a decision?

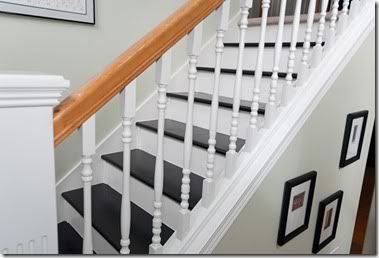
So, I decided that the best option was to lay down unfinished maple in the new rooms and sand down the existing wood, then have everything stained the same darker color.  Genius!  But then, I remembered Sarah over at pewter + sage talking about her floor dilemmas.  It seems maple doesn’t actually take stain well and they had some problems with the first coat of stain and had to call in the cavalry to get it done right.  But those floors turned out beautifully!

pewter and sage floors

(Source: pewter + sage)

I mean seriously – they make my heart sing just looking at them.  I decided I had to have them and called a flooring installer that we’d heard good reviews for.  He wasn’t so keen on my idea, but said he try a sample and see how it turned out.

Fine and dandy, but then we started realizing what having your floors refinished means: we’d have to leave our house for several days and we’d somehow have to get our grand piano out of the front room and into the play room, which would mean hiring someone to take the legs off and turn it sideways to get it through the door (this piano was my great aunt’s and is over 100 years old – no one paid in beer was going to be touching this thing!)  Suddenly, pre-finished wood was looking more appealing again.

But then I remembered that that opens up the possibilities again and my head exploded.

OK, not literally.

Floor guy brought over some samples yesterday.  I realized I probably don’t want to go as dark as the floor that I love in the picture above and that I probably want to go with something that looks fairly traditional.

So, as it stands now, we’re looking at a 3 1/4” maple in Brandy.  Looks something like this (only not hand-scraped):

maple brandy

Of course, we’re still probably a month out before we actually pull the trigger on this thing, so I’m sure I’ll change my mind.  This is a terrifying decision for me.  The money outlay is huge and if I get it wrong, I’m stuck with it for a looong time.  I’m trying to remind myself that it’s a hardwood floor and that they’re all beautiful (way better than my carpet for sure) and that they’ll be partially covered with rugs, so it will all be fine.  Just fine…

And oh yeah, I’ve been wanting to replace the tile on my fireplace for forever and we know it would be much better to do that before the new wood goes in around it, so now I have to find a tile that I love for my family room AND I have to retile that area before I can have my new floors.

So many things to do!  So many decisions to make!  My head may yet explode.

Friday, February 18, 2011

I Know What Kids Want

A few days ago, my friend Becca over at Home Is Where My Story Begins told me about an amusing conversation she had had with her 6 year old daughter.

It seems her daughter wanted to know why they didn’t have a play room like at Diane’s house.  Becca explained that, in order to have a play room, my daughters share a bedroom and that they would have to do the same at their house:  her daughter would have to share a room with her 4th grade brother.  Her kindergartener, of course, had no problem with this idea at first.  After a more thorough conversation of what that might entail and the discovery that she’d probably have to give up some of her dolls and toys to make room for her brother, her daughter decided that wasn’t quite so appealing.  She then declared, “You always want everything to be perfect.  You always want to clean, clean, clean.  Our house isn’t kid-friendly like Diane’s…”

DSC_3282

(Apparently, this is what she wants…)

It was at this point that I almost fell on the floor laughing and, if I hadn’t been standing on a concrete sidewalk – in public, I would have done just that!  You see, I have never been to a house that is MORE kid-friendly than Becca’s.  The woman is a kindergarten teacher!  She has an art center right next to her kitchen table because that’s where the kids like to do art.  She bakes, and bakes…and bakes.  She throws Halloween and Christmas parties for her kids’ friends and she even invited all the kids in their classes over for a movie night!  *I* would like to be a kid at Becca’s house.

This leads me to only one conclusion:  Kids don’t know what the heck it is they want and they (like the rest of us) don’t appreciate what they have.  But, I can tell you some of what I think they need:

  • They need parents who are around and who love them
  • They need an outlet for their creative endeavors
  • They need to run around outside and make up silly plays that their parents dutifully clap for
  • They need cinnamon rolls

IMG_0084

  • And maybe, sometimes, they need to make a giant mess…but they also need to learn how to clean that mess right back up

So Becca, I’m here to say that you don’t need a play room to make your house kid-friendly.  You’ve already got that in spades.  And hey, if the little one still feels the need for the play room, I’ll trade places with her.  Think of the decorating possibilities!

Sunday, February 13, 2011

Mudding and Taping Drywall

Welcome back to the next installment of our drywall repair project!

At this point, we’d added insulation and hung the drywall pieces.  The next step was mudding and taping the joints and finishing the corners.  The corners were an unknown quantity for us since they’re rounded.  Our entire house has round corners, which I dislike (I understand I may be the only one).  My dislike was especially high during this project. 

Whether you have square corners or rounded corners, you can buy a metal piece (called a corner bead, I believe) which will make your corners strong and less likely to get dented when kids are running around the corner pushing their baby strollers.  We found the regular straight corners at Lowe’s, but we had to go to a special drywall supply store to get a bendable one for the arch.

DSC_3519

Mudding and taping is fairly simple, but I find it rather nerve-wracking because I’m so worried that I’ll end up “good-enoughing” it and then drive myself slowly crazy with bumps that we were unable to cover with texture and paint.  Basically, you take a trowel (start with a small one on your first coat and increase the size with each successive coat) and apply the mud over a seam.  Then, you tear a piece of drywall tape (it’s not at all sticky like real tape) and press it in over your mud.  Then, you take your trowel and slide it along the tape to work out the excess mud.

 DSC_3513 

You’ll also apply the mud to your screw holes and then scrape it off so it’s flat.  You end up with something like this after the first coat:

DSC_3514

Let the mud dry for at least 6 hours, then come back and run your trowel along the wall to knock off any big bumps.  You can then proceed with your next coat with a slightly bigger trowel.  The idea is that you’ll do enough coats (probably 3) to completely cover the tape and as you use a bigger trowel with each coat, the mud will be blended out farther and farther so that it looks smooth.

This project had a couple of difficulties for me.

First, it was now the week after Christmas.  We do something out of the house every day during that week, so we had to work around our adventures.

Second, one of those adventures involved hurting my leg at one of those bouncy places, so I couldn’t climb a ladder for several days, putting this project on hold (for what turned out to be a couple of weeks).

Third, when the drywall was cut, some of the corner beads were left in place, so I needed to try to match up to them.  Here, you can see where the yellow wall sits out slightly above the new drywall.  I decided to just blend that in with mud.

DSC_3516

Fourth, did I mention my walls have rounded corners?  Perhaps I installed them wrong, but they seemed to be really large and they sat out from the wall farther than they should have.  Again, I decided to blend in with mud…because mud fixes everything.

Because I had some fairly large differentials that I had to blend, I ended up doing 4 or 5 coats.  I was a little concerned that the mud was so deep that the wall would end up being really fragile afterwards, but it seems to be OK.  The one thing I will suggest if you find yourself in this position is to add many, many thin coats.  The thicker your coat, the longer it takes to dry.  I also found that it would get air bubbles in it and, when I sanded it down, the air bubbles would result in little divots in the wall.

Finally, FINALLY, I finished with all the coats and had fairly flat walls.  The next step is to sand it down, so that the walls are smooth.  This part is really important, you want to make sure you get it pretty darned smooth because texture doesn’t cover everything.  I don’t have any pictures of this part.  I can suggest that you use a sanding mesh, rather than the drywall sanding “paper” – at least my dad suggests this.  Apparently the paper fills up so fast that you’re constantly changing it out, so the mesh is much easier to use.

We sanded twice and learned that it’s very difficult to see the imperfections if you don’t have direct lighting on the area that you’re working on (this turned out to be very helpful, since sanding on the ceiling is a pain and that was one area where it was definitely “good enough”).

After sanding, we sprayed on the orange peel texture.  You can buy ca ns of this stuff at any home improvement store.  Make sure you practice before you get started.  Also make sure you move anything in the immediate (or semi-immediate) vicinity that you don’t want to get spray texture on.  I’m just sayin’.

The final step was paint, which meant I had to finally pick a color to replace the Cowslip yellow.  I also had to figure out how to paint the ceiling patch without having to repaint the entire ceiling.  A friend of mine cleverly suggested cutting out a piece of wall from a closet and taking it in to have it color matched.  Worked a treat!

After replacing the trim (which was another painful project with no pictures to remind me, but which did result in our getting a new compound miter saw – awesome!) and here we are now:

DSC_3547

DSC_3548

Looks pretty professional if I do say so myself!

Friday, February 11, 2011

How to Repair Drywall (and take as long as possible to do it)

When we last left, my husband and I were preparing ourselves for an epic drywall repair project…one week before Christmas.

Since the restoration guys cut out part of the outside wall and ceiling, the first order of business was to add some insulation.  Insulation is nasty stuff to work with.  It’s made from tiny, tiny pieces of fiber glass which will get on your skin and make you itchy and can be breathed into your lungs, so make sure you’re completely covered and that you’re wearing a mask.  Luckily, we had very little to do, so it only took a few minutes.

DSC_3475

Next, hanging the dry wall.  This is actually pretty easy.  You just cut the pieces to size and screw them in.

 DSC_3477

The interesting piece for us was the underside of that arch.  We’d never had to bend drywall before, so off to the Internet we went.  Seems if you spray the backside of the drywall with water, wait 10 minutes, then spray it again, it will bend pretty easily.  We tried it out, and that’s just what happened!  Amazing!

DSC_3479 

Hanging the drywall went so smoothly, we decided to take a break for the day and start with mudding the next day.  Stay tuned…

Wednesday, February 9, 2011

Rain, Rain Go Away!

Every December, we go out to a fancy dinner with our long time friends and then stay the night in a hotel.  We’ve been doing this for years as a Christmas gift to all of us.  It’s always great fun and it’s nice to have a night away.

This year (or I guess I should now say: last year) we had a lovely time and returned home the next day (Sunday) to this:

MeltingWall

That’s paint!  Melting down the wall!

Turns out that the roof line just above there was not built up to standards and we’d had a bunch of rain the night before.  This had never caused a problem before, except that there was also a bunch of leaf debris in that spot which caused the water to pool…and then to find the path of least resistance: right down our wall!

We immediately got on the phone with our insurance company to start the claim process, then we contacted a water clean-up company to come out and help us get the thing dried out.  All day Sunday, I was trying to figure out how slice off the bubbling paint, so that I would have the least amount of repainting to do.

Imagine how I laughed at myself with the restoration people came the next day and proceeded to do this to my front entry:

IMG_20101213_154743

Here I was worrying about having to repaint, completely ignoring the fact that the walls would need to come down in order to dry out what’s inside!  And this isn’t even my first flooding experience!

Not only did they cut off what you see here, but they cut off the other side of the arch and part of the ceiling  too!  They were definitely being thorough:

DSC_3472

I was operating under the assumption that insurance would not be covering this, so we knew whatever they cut down was going to have to be replaced by us.  When I saw the arch get removed, my face had a sad.  :-(  I’ve hung, mudded, and taped drywall before, but never had I had to bend drywall and I’d never dealt with those blasted rounded corners before!

The restoration guys left about a million fans and dehumidifiers in my front room for three days.  The noise was maddening!  When they finally left, we were left with some gaping holes in our arch way and the knowledge of what we’d be doing for the next few weekends…

Monday, February 7, 2011

Refinishing the Dining Table – Part 2

In my last post, I had suddenly decided that my dining table needed to be sanded down and re-stained RIGHT NOW (which seems to be how most of my projects come about).  The sanding went so well and I was so pleased with the results.  It was now time to pick the stain!

In case you missed it, here’s what the table looked like before:

DSC_3377


I knew I wanted a much darker stain that would match my piano which is mahogany-ish.  At Lowe’s, I couldn’t find the exact stain I was looking for, but the closest I found was a two-in-one stain where the poly is already mixed in.  I really didn’t want to use a two-in-one, but I liked this color the best, so I went with it.  BIG MISTAKE!  This project was about to turn into one of the most frustrating/depressing projects I’ve ever done.

We took the table apart and moved it out to the garage so I could stain without destroying the carpet and fuming everyone out of the house.  SECOND MISTAKE!  It gets a little cold outside in December which makes the stain a little more difficult to apply.  Long, sad story short, it was so difficult to get the stain to go on without brush strokes showing and it would start to “seize up” so quickly that I had a horrible time getting the color to be even across the long expanse of the top.  If I had to do it again, I’d choose a simple stain that I could rub on and wipe off THEN do the poly last.  Even if I had to go with a slightly different color to do it.

I wanted it dark, so I had to do coat after coat – my heart breaking with each one.  I finally moved everything back into the house for the final coat.  That last coat was the easiest I did.  I so wish I had done that earlier. 

DSC_3385

After the first coat where I dropped one of the freshly stained legs on the garage floor, getting little tiny pebbles into the stain, my husband figured out how to hang up the legs, so I could stain all sides at once and not worry about dropping them.

 DSC_3384

DSC_3386

You can see a little bit of the wood pattern on the top here.  You can also see the horrible brush strokes.  With each coat I added, the beautiful pattern was disappearing.  So much sadness.

DSC_3388

Finally, after (I think) 6 coats, the table was dark enough.  The brush strokes drove me nuts, but I wasn’t about to sand it down again – even if I thought it was possible without completely sanding through the veneer, so I decided to put it all back together again and just live with it for a while.

So, here’s what I’ve learned about staining:

1) NEVER use the two-in-one stain plus poly, the rub on wipe off stain is SO much easier to apply
1b) If you have to use the stain plus poly, get the best brushes you can
2) Don’t stain in a 40 degree garage – bring it inside if you have to
3) Breath (though maybe with a gas mask on).  Don’t panic.   If it’s not perfect, you can always cover it up with some cute decorations, right?

I’ve eaten at it now and I’ve even allowed guests to eat at it.  I’ve gotten some compliments on it and it doesn’t drive me as crazy as it did at first.  I think it’s a little more red than I wanted, so I might go grab another stain with poly in a slightly less red color and do one more coat over the top, but maybe I won’t.

Here it is now:

DSC_3532

I found a paint color that matched the stain incredibly well and I painted the chairs.  My plan is to make white slip covers for them, so only the legs will be showing and there was no way I was going to sand those puppies down!  So far, I have about half of one slipcover done, but I’m liking the way it looks:

DSC_3536


I’m linking up to:

beforeAndAfterButton

Saturday, February 5, 2011

Refinishing the Dining Table – Part 1

She’s baaaaack.  Maybe.  :-)  I’ve been avoiding my blog lately because I just couldn’t decide what I wanted it to be or how much effort I wanted to put into it, so I had basically decided that I wasn’t going to blog anymore.  I’d even stopped READING other blogs, if you can believe that.  I couldn’t quite bring myself to just pull it down, though.  Then, yesterday, someone commented on one of my first posts about my kitchen (Thanks, Kelley!) and I was reminded how nice it feels when someone enjoys one of your projects and you can help them out in some way.

So, this morning, I read a few blogs and decided to give it another go.  I think I’ve had enough of a breather that I can do it on my own terms now.  I’ve had several projects going in the last two months, including fall-out from a roof leak, so I have a bunch of things to share.  We’ll take it slow and see what happens.

******************************************

As I’ve alluded to in the past, I’m on a mission to get rid of the yellow in my house.  Because the floor and cabinets were all the same wood, my kitchen started out so very yellow.  My dining room was another area that was filled with yellow.  The dining set was also an awful yellow tone (I have no idea what we were thinking), which didn’t go so well with the Cowslip yellow walls that I had wanted so badly when we moved in 10 years ago. (You can see in this picture that I was already testing new paint colors for the wall.)

DSC_3377

I knew I wanted to change the dining set, but I wasn’t sure if it was solid wood or some laminate.  I figured I could paint it, but it had this beautiful wood grain pattern on the top (which of course is covered in the picture above) that I didn’t want to lose.  I’d think about sanding and staining it, but  would run up against the fact that I thought there was no way I could sand it if it was laminate.   I can’t quite remember what set me off one Friday morning in early December – I think I had read some blog about someone sanding down some veneer, but it occurred to me that maybe the table was actually veneer, not laminate.

I ran down to the table and crawled around underneath to check, but couldn’t determine whether it was veneer or solid.  I was on a mission, though, so I ran out to the garage and grabbed my hand sander and went to work on the inside of one leg.  That went well, so I kept going – giggling to myself the whole time.

As I was sanding, I did learn that it was, indeed veneer – at least the lip on the side – and I did sand a bit too much in some spots, so you could faintly see the particle board underneath, but hey the particle board was smooth at least!

I sanded for four hours and by the time I was done, it was beautiful!  The grain stood out so impressively and you could really see the lovely pattern on the top.

DSC_3380


DSC_3379

This is what the table looked like by the time my husband came home (I believe I had sent him some cryptic texts that let him know I was up to something, so he’d at least be prepared for some upheaval).  I was SO excited.  This had gone so much better than I had feared and I couldn’t wait to pick the stain color.

I’ll stop here to savor the good times as this project was about to turn into the project from hell and break my heart over and over again…

Related Posts with Thumbnails