Showing posts with label Stairway. Show all posts

Friday, October 29, 2010

There’s a Mouse in the House!

It’s pretty late to be posting Halloween decorations, but I’ve been meaning to post this for a while and Thing 2 really wanted me to share it, since we worked on it together.  So…

A while back, I was perusing the blogs and came across the cutest Halloween project for the stairs at Thrifty Decor Chick.  She had little mice running up and down her stairs!  How cute is this?

Thrifty Decor Chick Mice (Source: Thrifty Decor Chick)

I loved it and immediately decided to copy it wholesale.  Lucky for me, she even included a link to Martha Stewart with some handy, dandy cut outs.  I ran right out to get construction paper and spent an evening in front of the TV, cutting out mice.  Then, they sat in a pile for almost two weeks.

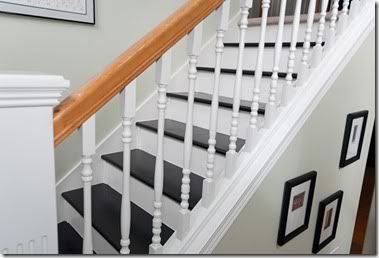
Finally, we had some free time and Thing 2 and I got to work taping our little rodents to the stairs and here’s how it turned out:

DSC_3237

I love how it gives a festive touch to our staircase, which usually gets the decorating shaft.  Kids also love it.  I think because it’s right down at their level, they’re immediately drawn to it.  It’s very cute to watch them the first time they see the meeces.  I think they think I’m a bit crazy, but that’s part of the fun of Halloween, right?

DSC_3240


BTW, I’ve had several people ask me what colors I used to paint my stairs.  I had always meant to post that information, but never got around to it.  Since this is a post about my stairs, I’ll add it here:

The black is SW Tricorn Black.  It is a great, true black.  The white is SW Creamy.  It looks crazy yellow on the sample, but feels really clean and bright in our rooms.  These are also the colors I used to paint my kitchen cabinets and island.


I'm linking this up to:

Sunday, September 12, 2010

Stairway – They’re Done! They’re Done!

DSC_3142

We had our annual End-of-Summer BBQ on Saturday and I had promised myself that the stairs would be done for the party.  I had to put in a few late nights, but I kept my promise!  (Well, actually, I’m about 90% done.  There’s still a bit of finish work to do, but I’m celebrating being done for now.)

Just as a reminder, here’s how they looked a month ago:

DSC_2431 These pictures really don’t show how grody the carpet was, so you’ll have to take my word for it: yuck!

DSC_2433 

And here’s how they look now:

DSC_3127  DSC_3142

DSC_3140

So. Much. Better!

At some point, I plan to paint the handrail black too.  THEN, I’d like to paint the walls the same blue as the stairs in one of the houses in Modern Family (I drool over them every time I watch that show!)  I would love to figure out what color it is, but this is the best picture I can find of it:

Modern Family Stairway

*drool*

While I’m at it, I’d love to add some moulding to the wall.  I love Sandra’s at Sawdust and Paper Scraps:

Staircase Sawdust and Paper Scraps 

But for now, I’m just gonna sit back and enjoy the view:

DSC_3127


I’m linking this post up to:

The DIY Show Off toolsareforwomentoo

All Thingz Related Make it Yours @ My Backyard Eden The Girl Creative A Little Knick Knack
Get Your Craft On Tuesday

Tuesday, September 7, 2010

Stairway Progress (or Will This EVER Be Done?!)

We’ve added several more hours of labor to the stairs this weekend and they’re really starting to come together.  I’m starting to get excited, but there are so many little niggling things to finish, I’m starting to wonder if I’ll ever actually be done.

On Saturday, the stairs looked like this:

DSC_3084

Clearly on the right track, but lots and lots of filled nail holes to sand down and then paint and the landing still creaked!

I started the morning by sanding down the wood filler and then got to work painting the stairs!  I hate to tape and I didn’t want tape marring the beauty that would be revealed as I painted, so I decided to paint the edges by hand with a small paint brush.  Possibly not the wisest or most efficient choice, but definitely one that is all me.

Important safety tip: if you’re painting your stairs, make sure you paint every other stair, so that you and your family can still go up and down the stairs while they dry.  Also, lock up your animals!  Luckily, this time around, I followed both of those tips.

Sunday, I painted the alternating stairs and then we left to spend the day at the fair!

While I was painting, my husband was busy hammering.  He put just about a million nails into the boards on the landing  and now it doesn’t creak!  Of course, it looks like this now:

DSC_3094 

DSC_3095

Do you see all those little specs of paint or dirt?  No, those are all nails.  I’m going to have so much work to do to make those all mostly invisible, but it is so worth it to have a quiet floor!

And here’s what my stairs look like now:

DSC_3093(Look, you don’t even need to cross your eyes!)

DSC_3089 

Getting so close!  I still need to:

[  ]  Fill in nail holes on landing

[  ]  Re-paint landing

[  ]  One last coat of black on all stairs

[  ]  Touch up white paint and caulk

[  ]  Finish trim on front of landing

[  ]  Add floor molding to landing

And then I’ll be done!  Probably.  Well, then I want to paint the walls in the entry way with the dizzy-ingly high ceilings, add a great molding treatment to the walls going up the stairs, and figure out how to decorate these things (any suggestions here would be greatly appreciated):

DSC_3097

THEN I’ll be done.  But for now, I’ll just enjoy my progress so far:

DSC_3093

Monday, September 6, 2010

Stairway Progress - Paneling the Landing

Earlier last week, my kids had their friends over for a few days and were well entertained without me, so I took the opportunity to start working on the landing.

I don’t know if I ever detailed my plan for the landing (which was plain, yicky composite board of some kind) and I’m too lazy to look that up right now, so I’ll just recap:

I took a page from Thrifty Decor Chick’s book and decided to try tongue and groove wood paneling on the floor.  It’s thin and inexpensive – which made it perfect in my book.  I primed and painted several coats of black before I actually put it down.  Painting several coats of paint in all those grooves after it’s all put down on the floor did NOT appeal to me at all.

DSC_2636 

I also primed the landing floor in gray before a laid the paneling so that white primer would not show through, just in case there were gaps in the wood.  (I didn’t actually think this would happen, but I wanted to be better safe than sorry since there was no way I’d be pulling up paneling to fix that.)

DSC_3077

Then I grabbed my miter saw and got to work.

DSC_3079

This was actually a pretty easy process.  I basically cut the pieces to fit the full length of the landing and then randomly cut them in two pieces so that the seams would not always be in the same place (Note: I actually added an extra smidge for the width to account for the bit that the blade would take out when I cut it in two.)

DSC_3080 (My front porch workshop)

I laid them all out before I glued them down, then came back through with Liquid Nails.  I couldn’t figure out what to use to weigh down the wood while the glue took hold.  The biggest, heaviest thing I could think of was myself.  So, I grabbed a pillow, a book, and a drink and I laid out on the landing for about an hour.  Periodically, I would change positions so that my weight was distributed all over the floor.

I didn’t get a picture of me doing this, but here’s my daughter helping out:

DSC_3085

Here’s what it looked like when I was “done”:

DSC_3081

DSC_3082

At this point, I was feeling a bit nervous because the paneling creaked EVERY TIME you took a step on it.  It got a bit better by morning time, but clearly something more needs to be done.  I’m thinking lots and lots of nails!

BTW, I just have to mention how incredibly nice it was to spend most of a day on that landing and not have my nose crinkle up once!  You may remember that the carpet here had seen some kitty accidents.  Every time I walked by, I’d smell something – sometimes just a little and sometimes a lot).  Now, it smells of nothing!  I guess that makes treating it with a commercial odor remover a few times, spraying it several times with bleach, painting three coats of Kilz, and then sealing it with Polyurethane all worth while!

Saturday, August 28, 2010

Stairway Progress

I know you’re all just dying to see what progress we’ve made on our staircase.  I apologize for taking so long to get anything up here.  We went on vacation the week before last, so no work got done at all.  We got back last Monday and took Tuesday off to recover from vacation, so we were able to put in a bunch of work then.  Which is good, since nothing more happened this week!

Last time I posted, we had done a bunch of painting and had torn out one of the original treads and replaced it with one un-painted tread.  On Tuesday, my ever-so-nice hubby, spent the day pulling out the rest of the treads.  Unfortunately for him, he started with the most difficult one first!

I don’t have any really good pictures of it, but the riser on the very top stair didn’t actually go all the way up to the floor above it.  For some reason, the builders decided it was OK to just use some piece of scrap wood.  It was a really cruddy piece of wood, which was fine when it was covered with carpet, but was a real problem when all the risers are going to be on display!  I thought about cutting down some wood to fill it in (and then pretty it up with wood putty), but we didn’t like that idea, so we decided to pull the old one out and put in a new one.  I figured it wouldn’t be too difficult once the tread below it was out.  I mean there was a big hole at the top where we could pry it out!

DSC_2611

I was quickly proven wrong on Tuesday: the tread below it came up relatively easily, but there was just no way for us to get leverage to pry it out, so we went back to brainstorming.  My husband thought to get some really thin wood and just put a face on it.  Great idea!  Unfortunately, we didn’t have anything that would work and we didn’t want to make the trip to the store (or spend any more money on this project).  We eventually decided to go with the original idea and fill the hole in with very thin pieces of wood, then finish it off with a bunch of wood putty.

That actually worked out much better than we thought it would (you can see the end result in the picture below).  Of course, it ended up taking half the day!

DSC_3070

 (You can’t even see where the hole used to be!)

I was thinking I was going to need to change my expectations and started preparing myself for not having all the old treads gone, but once again the hubby pulled through for me!  He pulled off all the rest in record time and we got the new ones on!  Here’s where we’re at now:

DSC_3063

DSC_3071

We I now have a ton of hole filling and painting to do, but if you cross your eyes slightly, you can sort of see what it’s going to look like.  Here, let me do it for you:

DSC_3063-Edit

The last thing I did Tuesday night was to paint the last coat of Kilz on the landing.  What I forgot, though, is that our cats are nocturnal and they walk around a lot at night.  When we got up to go to bed, once we figured the landing was dry, we found a cute little present.

DSC_3067

If you look closely, you can see the foot prints go all the way up the stairs. 

DSC_3063

Lucky for this little kitty that I had already planned on putting another coat of black paint on the treads. 

DSC_3060 DSC_3061

Though, now I know I’ll definitely wait until after I’ve done ALL coats of paint on the landing!

Related Posts with Thumbnails