Waaay back in February or March, when I finally got my act together and painted the woodwork in our family room, I also arranged a picture wall behind our couch. I never really liked it (though I could never pinpoint why) and so I never actually finished putting pictures in the frames.
If you look closely in this picture, you’ll see that many of the pictures have the same photograph of a lovely young couple (who looks nothing like us) AND that the two big frames in the middle still have plastic around the corners.

(I think it actually looks better in this picture than it did in real life.)
For the past several months, every time we’ve had people over, someone has gotten a laugh out of the fact that we are prominently displaying pictures of people we don’t even know. Har har har.
Last Friday, that all changed! Ever since school started, I’ve been looking forward to having my Friday’s off, with no kids, to prepare for the weekend and to get some projects done. Unfortunately, ever since school started, I’ve been out of town or sick or both on Friday. Last Friday was the first day that I was home, alone, and healthy and I made the most of it!
I have been eyeing the white shelving in the dining room at Young House Love for a while now, but I haven’t wanted to spend any money, so imagine my excitement when Ana at Knock-Off Wood posted instructions on how to build a $10 shelf that was very similar.
Friday morning, I hatched my plan and, after dropping Thing 1 and Thing 2 off at school, I hit Lowe’s. I had measured earlier and decided that my shelves needed to be 7” long, so I was going to need to cut down my wood. I decided to have Lowe’s do it, since it would be so much faster than me having to measure and cut each piece (plus, I try to avoid using tools that can remove digits when I’m home alone).
I got home, pulled everything into my workshop (read: family room) and got started. Believe me when I say these things went together amazingly fast! I actually built all three shelves in just over 45 minutes IKnowRight?!. (Well, I built them in 45 minutes the first time…I actually had to take the last shelf apart and do it again, since I had put it together wrong. There may have been swearing, but I can’t say for sure. I might suggest adding a few minutes to actually double-check your work before you start drilling and gluing, but YMMV.)
I was by myself, so I couldn’t take pictures of the actual process, but here’s all I did:
1) Have the nice people at Lowe’s cut your 1x4s and 1x2s down to size.
2) Screw one 1x4 to another 1x4
3) Glue the 1x2 onto the front and secure it with finishing nails
I would recommend using clamps to hold your pieces together as you’re securing them. ESPECIALLY if you’re doing this alone. (Though I might recommend slightly smaller clamps that don’t fall over because they’re top heavy…)

If you need more hands, heavy battery-powered drills make nice weights.

Here they are after 45 minutes:

And getting painted:

Thing 1 helped me hang them when she got home from school. (That’s definitely a two person project!)
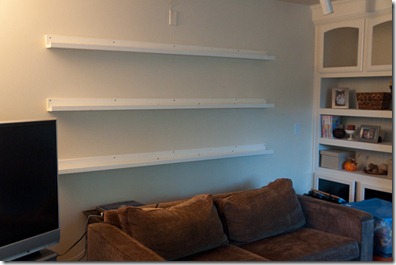
And then I ran around the house, grabbing every picture frame I could find. The girls actually had a bunch of fun with that because I was pulling out frames that had been in storage for a while, so we were seeing pictures we hadn’t seen in ages.
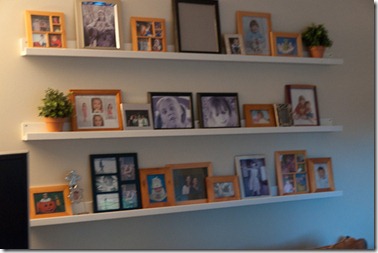
I through the pictures up in any old place because I was in a hurry as it was almost time for hubby to get home. I like to do projects while he’s at work and then hide all the evidence and see how long it takes him to notice. It’s how I keep our marriage exciting. I know he appreciates it and feels no pressure.
So, here’s what it looked like when he got home:

He noticed it right away. (Lucky!) Of course, it is pretty obvious and, while I had hidden all the evidence, it IS a bit difficult to hide the smell of paint, so he had a hint that he should be on the lookout.
I’m thinking I really like it. The picture frames are all a little orange-y, so I’ll be painting them white. I’ll probably need to thin them out a bit too, so it’s not quite so heavy. The new shelves next to the built-in shelves makes that side of the room much heavier than the window side, so I’ll need to figure out how to add some weight to the other side, but all in all, I’m quite pleased with my quick Friday project!


 Posts
Posts