Showing posts with label Shelving. Show all posts

Monday, October 11, 2010

Quick and Inexpensive Picture Shelves

Waaay back in February or March, when I finally got my act together and painted the woodwork in our family room, I also arranged a picture wall behind our couch.  I never really liked it (though I could never pinpoint why) and so I never actually finished putting pictures in the frames.

If you look closely in this picture, you’ll see that many of the pictures have the same photograph of a lovely young couple (who looks nothing like us) AND that the two big frames in the middle still have plastic around the corners.

DSC_1837

(I think it actually looks better in this picture than it did in real life.)

For the past several months, every time we’ve had people over, someone has gotten a laugh out of the fact that we are prominently displaying pictures of people we don’t even know.  Har har har.

Last Friday, that all changed!  Ever since school started, I’ve been looking forward to having my Friday’s off, with no kids, to prepare for the weekend and to get some projects done.  Unfortunately, ever since school started, I’ve been out of town or sick or both on Friday.  Last Friday was the first day that I was home, alone, and healthy and I made the most of it!

I have been eyeing the white shelving in the dining room at Young House Love for a while now, but I haven’t wanted to spend any money, so imagine my excitement when Ana at Knock-Off Wood posted instructions on how to build a $10 shelf that was very similar.

Friday morning, I hatched my plan and, after dropping Thing 1 and Thing 2 off at school, I hit Lowe’s.  I had measured earlier and decided that my shelves needed to be 7” long, so I was going to need to cut down my wood.  I decided to have Lowe’s do it, since it would be so much faster than me having to measure and cut each piece (plus, I try to avoid using tools that can remove digits when I’m home alone).

I got home, pulled everything into my workshop (read: family room) and got started.  Believe me when I say these things went together amazingly fast!  I actually built all three shelves in just over 45 minutes IKnowRight?!.  (Well, I built them in 45 minutes the first time…I actually had to take the last shelf apart and do it again, since I had put it together wrong.  There may have been swearing, but I can’t say for sure.  I might suggest adding a few minutes to actually double-check your work before you start drilling and gluing, but YMMV.)

I was by myself, so I couldn’t take pictures of the actual process, but here’s all I did:

1) Have the nice people at Lowe’s cut your 1x4s and 1x2s down to size.

2) Screw one 1x4 to another 1x4

3) Glue the 1x2 onto the front and secure it with finishing nails

I would recommend using clamps to hold your pieces together as you’re securing them.  ESPECIALLY if you’re doing this alone.  (Though I might recommend slightly smaller clamps that don’t fall over because they’re top heavy…)

DSC_3200

If you need more hands, heavy battery-powered drills make nice weights.

DSC_3202

Here they are after 45 minutes:

DSC_3203

And getting painted:

DSC_3204

Thing 1 helped me hang them when she got home from school.  (That’s definitely a two person project!)

DSC_3206

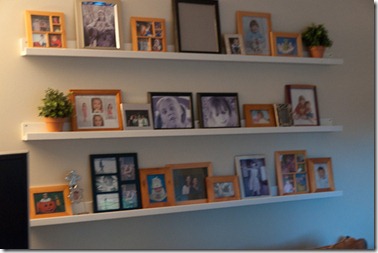
And then I ran around the house, grabbing every picture frame I could find.  The girls actually had a bunch of fun with that because I was pulling out frames that had been in storage for a while, so we were seeing pictures we hadn’t seen in ages.

I through the pictures up in any old place because I was in a hurry as it was almost time for hubby to get home.  I like to do projects while he’s at work and then hide all the evidence and see how long it takes him to notice.  It’s how I keep our marriage exciting.  I know he appreciates it and feels no pressure.

So, here’s what it looked like when he got home:

DSC_3207

He noticed it right away.  (Lucky!)  Of course, it is pretty obvious and, while I had hidden all the evidence, it IS a bit difficult to hide the smell of paint, so he had a hint that he should be on the lookout.

I’m thinking I really like it.  The picture frames are all a little orange-y, so I’ll be painting them white.  I’ll probably need to thin them out a bit too, so it’s not quite so heavy.  The new shelves next to the built-in shelves makes that side of the room much heavier than the window side, so I’ll need to figure out how to add some weight to the other side, but all in all, I’m quite pleased with my quick Friday project!
 

DSC_3208

Sunday, April 4, 2010

Hole in the Wall - No More!

A few years ago, I caved and allowed my husband to talk me into getting a monstrous TV.  I think it's like 1024 inches.  Or something like that.  It's large.

While I do enjoy watching TV on it, it does leave something to be desired on the decorating front. It also left a big empty cabinet in our family room built-ins.


Do you see the empty square on the left just above the chair?  That's where our old square TV used to go.  We thought it was pretty cool when we bought the house.  It has a nice, pull out and swivel shelf so you can see the TV from any angle in the room.  (Yes, that's a speaker hanging from the top of the empty square.)  Of course, when you get a TV that's 2048 inches, it no longer fits in that nice, built-in cubby.  I'm embarrassed to admit that the cubby sat empty like that for a couple of years.

Finally, I'd had enough of this room and decided to stop thinking about painting the woodwork and turning that hole into shelving and actually do it.  Unfortunately, that decision came right on the heels of painting the kitchen cabinets and I couldn't bear to paint another thing. 

After the holidays, I was able to drag myself out to the garage to collect my painting paraphernalia and got started. Painting the woodwork really brightened the room and got me motivated to deal with that hole in the wall! 

The biggest problem with that cubby was that it was so deep.  It was basically unusable.  We had to make it shallower.  So, we built a false wall in the cubby with some beadboard left over from the kitchen island, added supports for the shelves, painted everything and, lickety-split, we had something usable.


I painted the back wall the same color as the kitchen to tie them together.  Of course, having all these shelves presented its own problem for me: staging them!  I don't tend to have a lot of decorating stuff hanging around the house, so I was at a complete loss for what to put here.  Slowly, I was able to gather a few things to get at something that is acceptable.

The two boxes you see on the bottom shelf were actually a horrendous green color.  I had bought them years ago with the intention of covering them in something else, but never got around to it.  Now I needed to take care of them!  I found a table cloth that was similar to the curtains in the kitchen and covered them using spray adhesive.  They turned out beautifully.  Wish I had done that years ago!


The final piece that, I feel, really makes this wall is my craigslist mirror.  I had been searching and searching for a mirror for over the fireplace.  It was a difficult place to fit because it's a long, short area.  Most mirrors I found were much taller, but not as long.  One day, my craigslist search turned up a mirror that had almost perfect dimensions.  Even better, the top was arched...just like the doorways into the kitchen and  family room and my kitchen cabinets! 

We went to look at it and it was a little worse for wear - with a scratch in the mirror silver and some beat up wood.  But, I really liked the arch and the dimensions.  The fact that I talked the guy down to $30 was almost the best part.

We brought it home with the intention of painting it white too, but when we hung it up that night, I knew it was staying just as it was:


The dark wood ties together with the other wood in the room and, oh lordy, do I love that arch.  You can just see the arch to the kitchen (which it matches perfectly) in it's reflection.  The giant scratch in the silver doesn't even bother me, though the man did assure us we could "fix" it (or at least make it less noticeable) with aluminum foil.  But I like the history the scratch gives it.

My husband put the finishing touch on the mantel by placing my new thrift store candelabra and candles in the center of the mirror.  The wood matches perfectly and the candles smell so good.

This room used to drive me nuts because it never seemed to go together.  Even though we had nice furniture, it still felt like a "my first apartment" with everything just thrown in.  Now when I turn the corner into this room and I see my new shelves and mirror, I like what I see and I smile.

This post is linked to:


     The DIY Show Off   
       
Related Posts with Thumbnails