
I know you’re all just dying to see what progress we’ve made on our staircase. I apologize for taking so long to get anything up here. We went on vacation the week before last, so no work got done at all. We got back last Monday and took Tuesday off to recover from vacation, so we were able to put in a bunch of work then. Which is good, since nothing more happened this week!
Last time I posted, we had done a bunch of painting and had torn out one of the original treads and replaced it with one un-painted tread. On Tuesday, my ever-so-nice hubby, spent the day pulling out the rest of the treads. Unfortunately for him, he started with the most difficult one first!
I don’t have any really good pictures of it, but the riser on the very top stair didn’t actually go all the way up to the floor above it. For some reason, the builders decided it was OK to just use some piece of scrap wood. It was a really cruddy piece of wood, which was fine when it was covered with carpet, but was a real problem when all the risers are going to be on display! I thought about cutting down some wood to fill it in (and then pretty it up with wood putty), but we didn’t like that idea, so we decided to pull the old one out and put in a new one. I figured it wouldn’t be too difficult once the tread below it was out. I mean there was a big hole at the top where we could pry it out!

I was quickly proven wrong on Tuesday: the tread below it came up relatively easily, but there was just no way for us to get leverage to pry it out, so we went back to brainstorming. My husband thought to get some really thin wood and just put a face on it. Great idea! Unfortunately, we didn’t have anything that would work and we didn’t want to make the trip to the store (or spend any more money on this project). We eventually decided to go with the original idea and fill the hole in with very thin pieces of wood, then finish it off with a bunch of wood putty.
That actually worked out much better than we thought it would (you can see the end result in the picture below). Of course, it ended up taking half the day!

(You can’t even see where the hole used to be!)
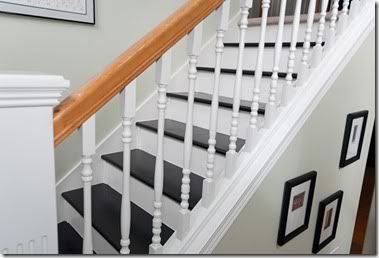
I was thinking I was going to need to change my expectations and started preparing myself for not having all the old treads gone, but once again the hubby pulled through for me! He pulled off all the rest in record time and we got the new ones on! Here’s where we’re at now:


We I now have a ton of hole filling and painting to do, but if you cross your eyes slightly, you can sort of see what it’s going to look like. Here, let me do it for you:

The last thing I did Tuesday night was to paint the last coat of Kilz on the landing. What I forgot, though, is that our cats are nocturnal and they walk around a lot at night. When we got up to go to bed, once we figured the landing was dry, we found a cute little present.

If you look closely, you can see the foot prints go all the way up the stairs.

Lucky for this little kitty that I had already planned on putting another coat of black paint on the treads.


Though, now I know I’ll definitely wait until after I’ve done ALL coats of paint on the landing!


The kitty prints are hilarious!!!
ReplyDeleteWe plan on doing out stairway this winter...We will be sure to keep them in the bedroom with the door shut at night!!!
Can't wait to see them finished!!!
i actually think that would be kind of cute and quirky to have some paw prints going up your steps- too funny!
ReplyDeleteWow his project is really coming along. It is going to be so worth it when you guys are done. I loved the blurred picture and the cat paws. So funny!
ReplyDeleteOh no!!! It is going to look amazing when it's finished. Just one more step to cover up those tracks. hehehe
ReplyDeleteThe footprints are just so cute! ;)
ReplyDeleteI love the footprints--:)
ReplyDelete