
Welcome back to the next installment of our drywall repair project!
At this point, we’d added insulation and hung the drywall pieces. The next step was mudding and taping the joints and finishing the corners. The corners were an unknown quantity for us since they’re rounded. Our entire house has round corners, which I dislike (I understand I may be the only one). My dislike was especially high during this project.
Whether you have square corners or rounded corners, you can buy a metal piece (called a corner bead, I believe) which will make your corners strong and less likely to get dented when kids are running around the corner pushing their baby strollers. We found the regular straight corners at Lowe’s, but we had to go to a special drywall supply store to get a bendable one for the arch.

Mudding and taping is fairly simple, but I find it rather nerve-wracking because I’m so worried that I’ll end up “good-enoughing” it and then drive myself slowly crazy with bumps that we were unable to cover with texture and paint. Basically, you take a trowel (start with a small one on your first coat and increase the size with each successive coat) and apply the mud over a seam. Then, you tear a piece of drywall tape (it’s not at all sticky like real tape) and press it in over your mud. Then, you take your trowel and slide it along the tape to work out the excess mud.

You’ll also apply the mud to your screw holes and then scrape it off so it’s flat. You end up with something like this after the first coat:

Let the mud dry for at least 6 hours, then come back and run your trowel along the wall to knock off any big bumps. You can then proceed with your next coat with a slightly bigger trowel. The idea is that you’ll do enough coats (probably 3) to completely cover the tape and as you use a bigger trowel with each coat, the mud will be blended out farther and farther so that it looks smooth.
This project had a couple of difficulties for me.
First, it was now the week after Christmas. We do something out of the house every day during that week, so we had to work around our adventures.
Second, one of those adventures involved hurting my leg at one of those bouncy places, so I couldn’t climb a ladder for several days, putting this project on hold (for what turned out to be a couple of weeks).
Third, when the drywall was cut, some of the corner beads were left in place, so I needed to try to match up to them. Here, you can see where the yellow wall sits out slightly above the new drywall. I decided to just blend that in with mud.

Fourth, did I mention my walls have rounded corners? Perhaps I installed them wrong, but they seemed to be really large and they sat out from the wall farther than they should have. Again, I decided to blend in with mud…because mud fixes everything.
Because I had some fairly large differentials that I had to blend, I ended up doing 4 or 5 coats. I was a little concerned that the mud was so deep that the wall would end up being really fragile afterwards, but it seems to be OK. The one thing I will suggest if you find yourself in this position is to add many, many thin coats. The thicker your coat, the longer it takes to dry. I also found that it would get air bubbles in it and, when I sanded it down, the air bubbles would result in little divots in the wall.
Finally, FINALLY, I finished with all the coats and had fairly flat walls. The next step is to sand it down, so that the walls are smooth. This part is really important, you want to make sure you get it pretty darned smooth because texture doesn’t cover everything. I don’t have any pictures of this part. I can suggest that you use a sanding mesh, rather than the drywall sanding “paper” – at least my dad suggests this. Apparently the paper fills up so fast that you’re constantly changing it out, so the mesh is much easier to use.
We sanded twice and learned that it’s very difficult to see the imperfections if you don’t have direct lighting on the area that you’re working on (this turned out to be very helpful, since sanding on the ceiling is a pain and that was one area where it was definitely “good enough”).
After sanding, we sprayed on the orange peel texture. You can buy ca ns of this stuff at any home improvement store. Make sure you practice before you get started. Also make sure you move anything in the immediate (or semi-immediate) vicinity that you don’t want to get spray texture on. I’m just sayin’.
The final step was paint, which meant I had to finally pick a color to replace the Cowslip yellow. I also had to figure out how to paint the ceiling patch without having to repaint the entire ceiling. A friend of mine cleverly suggested cutting out a piece of wall from a closet and taking it in to have it color matched. Worked a treat!
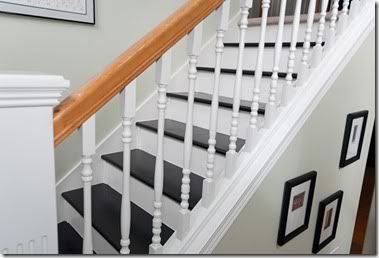
After replacing the trim (which was another painful project with no pictures to remind me, but which did result in our getting a new compound miter saw – awesome!) and here we are now:


Looks pretty professional if I do say so myself!


Uhg. Taping and mudding is no fun. I've done some minor things, but nothing compares to what you've accomplished. I guess you need to pull out of patience hat and take it slow. Great work.
ReplyDeleteI'd say. Looks great!
ReplyDeleteThat was some serious work you did! Makes you appreciate the craftsman who do that for a living. But I must say, yours looks very professional! Awesome job!
ReplyDeleteYour house is beautiful! I found you from UniqueHorn Designs and am following. We just moved and will be re-doing almost everything in the house! I'd love for you to stop by my blog and follow if you'd like. Nan
ReplyDeleteWhat a beautiful house you got! Looks gorgeous and attention snatching. Just revealed your drywall renovation while scrolling my mouse pointer on the google search page looking for a reliable and affordable drywall companies near me. This was totally thrilling read and was impressed how well you finished the mudding and taping job. This was incredibly wonderful.
ReplyDeleteSo cool and awesome job you did Diane. So adorable and pretty much worth to try for our own home. Using the pieces of drywall, mudding and tapping- oh all the steps and efforts you delivered in this post was tremendously loving and you of course deserve a big thanks for this fascinating project. The final finish made the rooms really super beautiful and flashing.
ReplyDeleteAnyway home addict guys in Sacramento are, looking for a skilled and trusted drywall repair of installation service or company? Well, I couldn't but recommend to step into Sacramento drywall service. They help on both large and small projects, whether it’s a remodel and you need a hand with the hanging and finishing of your drywall, or your drywall has been cracked, has a hole or needs some water damage repair work done, which may be a quick fix, they can help faster than your imagination.