Tuesday, May 25, 2010

Free Pots Makeover

DSC_1748

I mentioned the other day that I got some pots from our neighborhood garage sale.  They’re plastic, but they’re large and they were FREE!

DSC_1733

I’ve been thinking I need to put some pots on the front porch, so when I saw these, I grabbed as many as I could carry!

Yesterday, I decided to start their makeover.  I gave them a good cleaning and set them out on a tarp to receive their special treatment: spray paint.

After a coat of primer and several coats of black, they were ready for some color.

 DSC_1746 DSC_1747
(Just ignore the dirt smudges my gloves left)

DSC_1745
(Hmmm, now I’m thinking my red pillows don’t work so well…)

I had the primer and the black spray paint already, so this whole project was free. free. free!  Which makes it OK that I had to go out and buy a bunch of plants for them, right?

Immediately after I potted the plants today, it started raining.  Whenever it rains, my kids ask to go on a “Rain Walk”, which translates loosely to “go out and jump in all the puddles you can find and get as wet as you possibly can.”  Of course, I had to say yes…

DSC_1752 DSC_1751 DSC_1768DSC_1774


I'm linking up to:
 http://linda-coastalcharm.blogspot.com/

Monday, May 24, 2010

Cleaning Grand Plan – Dining Room/Misc

I had planned on writing this post much earlier today, but was side-tracked by my keys going missing.  Normally this wouldn’t cause much upheaval, but they went missing at the same time that my neighbor came over to tell me about break-ins in our neighborhood, so when we couldn’t find them after several searches, we started worrying that they’d been stolen!

WC_jail_keys

Luckily, after several more searches of the entire house (including the refrigerator!), they showed up: in the junk drawer.  Right where I should have looked in the first place.  Oh well, I did end up cleaning out another drawer while I was searching, so that’s a bonus.

It’s way past bedtime now, but I wanted to post my plans for this week to make sure I stay committed.  This week is an incredibly busy week for me, so I’m not going to pick an entire room, rather I’m going to clean up some messes around the house that have been allowed to fester for far too long.  So, without further ado:

  • Clean Goodwill pile off the dining room table and take it to Goodwill!
  • Put old toy shelf on Craigslist
  • Put away decor items sitting on coffee table in living room
  • Clean out closet in play room
  • Find home for box of VHS tapes (preferably not in my home)
  • Wipe down walls and baseboard in living room/dining room

That seems like enough for this busy week.  Especially since I have a couple of free items I got from garage sales and Craigslist this weekend that I want to work on.  My husband had an awesome idea for one of them that I really want to see if I can work out.  I’ll share more later this week!

Do you have any big organizing/cleaning plans for this week?

Sunday, May 23, 2010

Cleaning Grand Plan – Kitchen Recap

cleaning-kitchenToday was the last day of my first week of the Cleaning Grand Plan.  Last week, I chose to work on my kitchen.  I came up with a fairly aggressive list for the time I had and I didn’t quiiiite finish everything, but I was able to address several things that would have otherwise been left undone, so I feel pretty good!
Here’s where I ended up:
  • Wipe down all cabinets [x]
  • Wipe down chairs and barstools [x]
  • Wipe down baseboards [x]
  • Clean windows [x]
  • Clean out fridge
  • Clean stainless steel appliances [x]
  • Organize pantry [x]
  • Wash curtains [x]
  • Clean out/organize upper cabinets [x - mostly]
  • Clean oven [x]
  • Seal backsplash grout
  • Wash light fixtures [x]
  • Try to get stains out of granite
  • Clean microwave (added) [x]
  • Clean stove top (added) [x]
I still have one cabinet to organize.  I skipped the fridge because it gets cleaned out fairly frequently and I just didn’t make it to the countertops and backsplash.  Those are still pretty important to me, so hopefully I’ll fit them in soon.
However, my pantry and several cabinets ARE freshly organized.  My stainless steel appliances are fingerprint free and all the cabinets, baseboards, and furniture are clean (for the moment)!
DSC_1696
I am most happy with my oven, stove top, and microwave.  I think I must have missed class the day they taught that you are actually supposed to clean your oven on a semi-regular basis.  I understand it on a purely theoretical level, but I still haven’t internalized this particular lesson.  The beautiful, gleaming, shiny-ness of those appliances right now, though, just may be what I need to finally learn this lesson.
All in all, I’d say this week was a success and that my kitchen could probably use another week (man is there a lot to do to keep a kitchen clean!).  Tomorrow I’ll post the next room(s) that are going to get my attention. 
What room will you be working ?

Pantry Re-Org

As you may know, earlier this week, I made a commitment to concentrate on deep cleaning one area of my home for the next 13 weeks. *gulp*

This week, I’m working on my kitchen.  One of the major tasks on the list was cleaning out the pantry.  It’s generally fairly well-organized, but in the last few months, it’s gotten completely out-of-hand.  I must have been buying too many groceries or something because we just kept throwing new food on top of the old food. 

Of course, I forgot to take a picture right before I started, but here’s just after I removed a bunch of stuff from that top shelf.

DSC_1687

Unfortunately, it just doesn’t look as bad in these pictures as it really was.  But, try to imaging ALL of that stuff that’s sitting on the table, crammed into the top shelf that’s only half empty in these pictures.  Maybe that will get you closer to the actual horror.

DSC_1689

My plan was to try to do one shelf at a time, but in the end, I had pulled everything out of the pantry and put it all over the rest of the kitchen. DSC_1690 DSC_1693

When I started putting everything back, I tried to be very careful and make sure that I only put back things that made sense and that we would actually eat.  About 3/4 of the way through, though, I became a little more lax and allowed some of the non-food items (like the coffee pot that exists solely for my mom’s visits) to make it back in because that’s where we’re used to keeping them and it makes sense to us now!

Here’s the after.  Still fairly full, but much more organized.  and we even have a few empty spots just waiting to be filled in!

DSC_1694

DSC_1695 

The bottom right shelf is the kids’ snack shelf.  I can’t ever see what’s down there, but it’s just their height and they can easily get to what they need.

DSC_1697

As I was pulling everything out, I had fantasies of going to The Container Store and buying a whole pantry worth of cute containers, but it was not to be.  I actually had the containers that are in there already and I think I’m a genius because I used a bunch of Costco cashew/peanut jars and apple sauce jars to store snacks and such. (Each time I filled one of them, I laughed to myself as I imagined the half-hidden eye roll from my husband whenever he pulled one of these jars out of the dish washer…Now my freakish ways have been validated!)  And you can’t beat the simple, stylish beauty of a cat litter box turned into a cat food bin.

Can you?

Friday, May 21, 2010

Art Wall Tips

Thank you all for the kind words you left about my kids’ play room!  They were so wonderful to read!

As I mentioned in that post, I stepped outside of the box (for me) and decided to behave like a grown up and actually do some preparation when hanging the frames for my kids’ art wall.
DSC_1715

This is a big deal for me.  “Preparation” is a dirty word in my book.  “That’s not my bag, baby.”  And that’s why my husband was surprised when I used a level on our kitchen wall vinyl and why I don’t tape when I paint (heck, I don’t even change my clothes when I paint).

But, I’ve been trying really hard lately to do a little prep before I jump in with both feet in the hopes that it will make my projects go smoother (or at least have even better results).  It’s hard for me.  Very hard.

So, you know it must be good when I say that making templates for your wall gallery is worth the time and effort. 

**********

The day I finally decided to do work on this wall, I ran to my local Goodwill and got as many frames as I could find for under $2.00.  Then I ran home and painted them as fast as I could.  (On a side note, I swear I must be the worst spray painter of all time.  I have no patience (see above) and I end up getting my coats too thick and then I get runs and blotches and such.  But, “It doesn’t have to be perfect to be beautiful” as the Nester says, which very nicely sums up my philosophy on projects, so onward!)

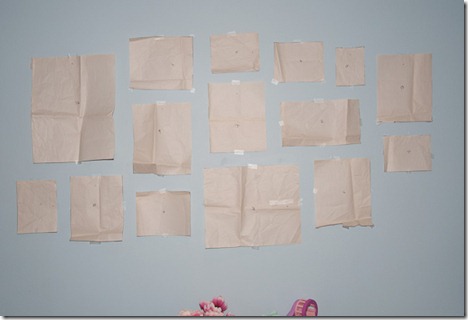
Once they were painted, I traced each frame onto butcher paper and cut out the template. 

  • Tip 1: I numbered each of the frames on the back and copied that number onto the templates so that once I had the best arrangement on the wall, I’d know which frame matched to which template.
  • Tip 2: I also marked on the templates where the nail would go for each frame.  If you’re using picture hooks, make sure you mark where you’ll actually put the nail, as opposed to where the bottom of the picture hook will sit.

My husband came home right about the time I was finishing the templates and was impressed with my forethought, though he did scoff just a little when I complained that it had taken me a whole HALF AN HOUR to do it.

Once I had the templates, I laid them out on the floor until I found a design I liked.  Then I taped them to the wall in that pattern.  It wasn’t quite right, so I moved the templates around until I found something that worked.

Then I got out my fine measurement tool (my cell phone – what?!) to make sure that the frames were evenly spaced (sort of).

Here’s what I ended up with:
DSC_1529-2

I then stared at the wall for a day or so to make sure I was happy with the pattern.  When nothing was happening FOR A WHOLE DAY OR SO, I decided that it was good enough for who it’s for and started hanging the frames.

  • Tip 3: If you’re painting your frames, you might want to figure out some way to label which inserts go with which frames to make it easier to put them all back together again.  (I actually did think of this before I took the frames apart and decided to just stack the inserts in order of the frame numbers, but the stack fell over and my organization went kaput.)
  • Tip 4: Leave your paper templates up while you hang the frames so you can make sure that you hung the frames where you intended them to go.
  • Bonus Tip: If you have nail holes on your wall that you need to touch up, do that and re-paint BEFORE you put up your templates.  If you do it WHILE your templates are already hanging there, the paper may end up sticking to your wall in an unsightly manner.  (I’m just sayin’.)

I did have to move a few nails, but it was nothing compared to what the wall would have looked like had I gone with my instincts and just started putting frames up where I thought they should go.

And here’s how it ended up:

DSC_1732DSC_1713                

I’m quite pleased with it and I really think it brightens the room!

  • Tip 5: Start your kids on making artwork for this wall as soon as you start the project, so you don’t have to badger them for days after you’re done to give you something to hang.  (Or, you could actually go through all the artwork that is stored away and use it, but where’s the fun in that?)


I'm sharing this at:

 Visit thecsiproject.com

Thursday, May 20, 2010

Play Room and Day Bed Reveal

DSC_1706-2

They’re done!  The day bed and the play room are (mostly) done! 

I actually used the comforter from my bed and the pillows from my girls’ beds, so the bedrooms look a bit of a mess, but hey, maybe I’ll decide to keep it this way and get a new comforter for MY room!

Let me give you a tour.  You’ve seen the day bed, but here it is again.  Doesn’t it look nice?

DSC_1724

Mr. Harry sure thinks so… DSC_1725

I also grabbed the curtains from the girls’ room and the little boxes that used to hang in my kitchen.  Those boxes were definitely a Eureka! moment.  I was driving down the road, chewing on what I could put there when I realized that the boxes were sitting in the garage doing nothing, but if I were to hang them in the play room, I would have a great little place to put all the girls’ 3-dimensional art work and doo-dads!

DSC_1708DSC_1707  

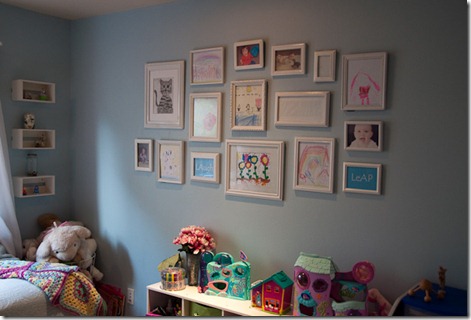
And, speaking of art work!  I finished the art wall.  Generally, Thing 1 produces reams of art work each day, but I actually had to harangue her a bit to actually get the wall filled in (and you can see there are actually still two frames empty).

DSC_1718

DSC_1732   DSC_1713 

Usually, when I hang frames, I just eyeball it and move them around until I like where they end up.  Which leaves a lot of holes in the wall.  This time, I actually did the responsible, mature thing and created templates and taped them to the wall.  This turned out to be a really smart thing to do because my original plan turned out to require drastic re-working. 

I’ve seen a few bloggers do the template thing, but I might just post on it myself because I ran into a few gotchas that might be good to share.

In addition to the art work, I put up baby pictures of each of us.  Aren’t we cute? DSC_1729DSC_1730

You may have noticed that you’ve only really seen one side of the room.  The left wall has a white board and a chalk board.  I still have some things I want to do with that, so that’s not going to be shared yet.

The wall opposite the bed holds this:     DSC_1719 Notice that the door doesn’t shut all the way?  That’s because it looks like this on the inside:

DSC_1720Actually, it was even worse on the inside.  I had to remove a bunch of stuff to even be able to open the doors.  I think that’s going to be next week’s project.  Should be fun!

But that’s messy.  Let’s finish with something nicer…

DSC_1706-2 

Ahhh…ready for my sister’s visit.

I'm linking up to:
Show and Tell Green

Wednesday, May 19, 2010

Kitchen Cleaning Progress

oven1

When I left you last, I had made a rather hopeful list of all the kitchen cleaning tasks I planned to get done this week.  It’s been a few days, so I thought I’d check in with my progress.

Here’s my updated list:

  • Wipe down all cabinets [x]


  • Wipe down chairs and barstools [x]


  • Wipe down baseboards [x]


  • Clean windows [x]


  • Clean out fridge


  • Clean stainless steel appliances [x]


  • Organize pantry [x]


  • Wash curtains [x]


  • Clean out/organize upper cabinets


  • Clean oven


  • Seal backsplash grout


  • Wash light fixtures [x]


  • Try to get stains out of granite


  • Clean microwave (added) [x]


  • Clean stove top (added) [x]


  • Wow, that’s actually pretty good progress.  I hadn’t expected to look so accomplished!  In the name of full disclosure, I had already cleaned the windows and washed the light fixtures…

    But! I did add one gigantic project that is making me sooo happy!  We have a gas stovetop with concave ceramic burner plates with large, heavy grates.  When we first moved in, I tried to keep the plates so clean.  (Well, all except for the one that was already fairly encrusted.)  But, over the past year or so, the encrusting got ahead of me and I never caught up and then I just stopped caring.

    Except, I didn’t actually stop caring.  It just bothered me a little bit every day that there was junk on the burners that I couldn’t get off.  This is how I felt:

    oven2

    So, the other day, I decided to try an idea that had been in the back of my mind: oven cleaner.  I sprayed oven cleaner all over the top of my stove and let it sit.  The directions said to wait for 8 hours, but I am impatient and so I started wiping it up after 4 hours.  The difference was amazing!  I was so excited that I sprayed even more oven cleaner on and let it sit all last night and all day today.

    When I got home from work tonight, I went to work with a toothbrush (don’t worry, it was my husband’s).  When I finished, the clouds parted and I’d swear I heard angels singing!  That thing is so shiny!  I keep walking through the kitchen just so I can look at it and pet it.

    I was thinking about trying to get a picture of it, but I knew I could never do it justice, so you’ll just have to use your imagination…

    (When I started this post, I was actually going to write about my pantry clean-up, but I got sidetracked and now I have to go stare at my shiny stovetop, so maybe I’ll share that some other time.)

    Related Posts with Thumbnails