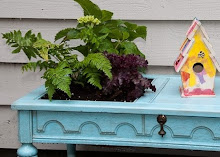
We finally finished converting the free coffee table I got off of Craigslist into a flower pot and I LOVE how it turned out!
I got the table a week ago thinking I would use it in my family room, but when I got it home, it turned out to be entirely too small. I was trying to think of alternate uses for it when my husband suggested we plant flowers in it. I agreed immediately and began plotting just how I’d do it.
Here’s what it looked like when I started:

It was a bit worse for wear and someone had been gnawing on the corners.

My first task was to try to improve the corners a bit. It’s going outside, so I knew it didn’t have to be perfect, but I wanted it to be a little smoother looking. Out came the wood putty and sandpaper and the chewed corners began looking a little better.

Next came primer and it’s looking better already!

I love the detail on the front. I think it makes it look so dainty!
Next, it got several coats of aqua spray paint. The color was a bit garish, but I knew it was going to be toned down quite a bit by the time I was done, so I kept painting. I wanted it distressed, so I sanded down the edges after each coat of paint.

To tone down the aqua, I grabbed some wood stain and a rag and went to work. I’d never aged or distressed anything, so I was a little concerned about this step, but I figured, worst-case, I’d have to repaint it.
I wasn’t sure how long to leave the stain on or how much stain to wipe off, but I soon learned that it worked best if I wiped it off just after I put it on and if I actually tried to get ALL the stain off. The stain got left in the nooks and crannies and in any scratches on the wood, so it made it look old and weathered.

Once the paint had dried, I gave it three coats of spray Poly Acrylic. I wasn’t a fan of the spray while I was doing the coats because it was hard to tell where it went and it never seemed thick enough. Once it dried, though, it was clear that it had very good coverage.
At this point, I was really excited! It was shaping up better than I had dreamed. We were heading into the more iffy part of this project, though: making the plant “boxes”.
The plan was to use chicken wire and coconut liners to make our own planters. We debated how to attach the chicken wire to the table and eventually decided to staple it to the inside of the vertical pieces.
We folded the chicken wire into a box and used zip ties to hold the corners together:

(Make sure you use gloves when working with wire…that stuff hurts!)

Once the boxes were ready, we stapled them to the wood with as many staples as we could possibly fit in.

I’m a little bit concerned about how well this will hold over the long-term, but it seems to be pretty strong so far!
Then, we stuffed in the coco-liners.

It’s raining outside this morning, but I couldn’t wait to see the final results, so out I went in the rain to finish planting. And now I have first-hand knowledge that the poly is working: the rain is just beading up on top.
I’m going crazy this week and linking up to: 


Garden Party 2010 at Southern Fried Dreams


